Items needed:
2 each 10 foot lengths of 1/2 inch flexible PVC pipe. These are the ivory
colored ones, not the white ones that are NOT flexible. You will find them
in Home Depot, but not in the plumbing area.
8 machine type screws about a number 10 X 1 3/4 no bigger if you must
use the slot head screws there is one slightly smaller that will work just
fine. 8 nuts to fit the above 16 washers to fit the above. I preferred the
hex head screws as it is easier to get behind the frame with a wrench than
using a screwdriver.
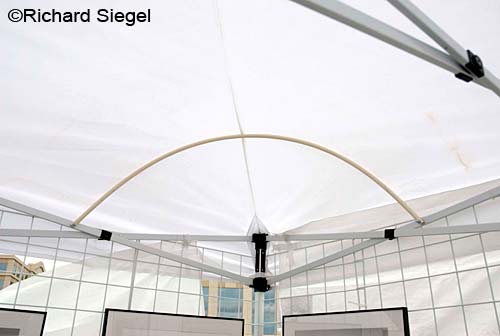
Cut the two 10' lengths of 1/2 inch pipes in half leaving you with four
5 foot lengths
Drill a 1/4" hole as close to the size of the screw as possible in each end
of the PVC pipe in the exact same point on both ends.
Drill a hole in the frame of the canopy about 5 or 6 inches from the
cross nut of the canopy frame on all sides of the frame. Do NOT make a
hole any bigger than you have to in either the canopy frame or the PVC
pipe. This means that you have two holes on all four sides of the canopy
frame.
Now you put the screws in from the outside of the frame using one of
the washers, but not the inside as this will push the canopy fabric and
you don't want to stretch it there as it may tear the fabric. If you did
it right, you'll have to screw the screw in otherwise you made either the
hole in the canopy frame or the PVC pipe too big. Slide the PVC pipe onto
the screw, then add the second washer and nut in this order. Do not over
tighten, you just need it snug. You will see that the PVC pipe looks like
a half circle. Then you physically move the pipe to the center of the tent
so that the top is snug and has no place for water to rest. Now tighten
the screws just until the PVC pipe barely starts to come together. Make
sure your pipe looks up almost to the sky, not sideways. The above
installing of the new hoop is easier to install when you put up your
canopy if you raise the legs so that you are close to eye level to the
holes and can still move the hoops skyward. Remember that it doesn't hurt
to have the screws extra length
The above is how I did it, but I have seen people do the same thing
except instead of drilling the holes as I did, they use the frame's cross
member screw hole and buy a longer screw to put in there and not have to
make new holes in the frame. This option did not look like a good idea
when I was blueprinting the project as I didn't like the idea of having
the cross member separated at any time.