|
| |
|
Preparing Images for Submission
[ Contents ] [
Articles ] [
Members ] Resources ] [Sponsors
]
[
Digital Jury Services for Artists ] [
Join the Forum ]
[ Support the Forum ] [ Consulting
] |
|
|
|
If you need help preparing your images
or want to send me prints or slides to scan
E-mail or telephone 412-767-8644
for instructions |
|
Step by Step Procedure for sizing your
digital images
Please size them to 300 pixels long dimension
Please use your name as the image title.
For example:
larrybermen01.jpg, larryberman02.jpg |
|
Reducing a photographic image for efficient viewing is a five step process.
1. Open in your image editing program and SAVE AS the proprietary
UNCOMPRESSED file format that your program uses - NOT as a JPEG! If you're unsure of
which format to use,
save as a TIF file. By saving as a new image, the original file will
not be compromised and can be archived for future
use. For Photoshop users, convert your images to PSD format; for Paint Shop Pro
users, convert your images to PSP format.
2. Examine the composition. Crop to remove unnecessary detail.
Well balanced, tighter images often have more impact and result in
smaller file sizes.
3. Optimize the image using color, contrast, and density controls.
More advanced programs allow adjustment of curves and levels of
your image.
4. Reduce the pixel dimensions to a viewable
size. For this page, an image size of 300
will work well. Click here to read why
ONLY PIXELS
COUNT on the web. After reducing the physical size, images often are
improved with a slight bit of unsharp masking.
5. Save the image as a COMPRESSED jpeg. Compress the image until it shows obvious
artifacts in areas that have strong contrast edges. Then back off a bit
by reducing the amount of compression. This is why the side by side
comparison feature is so important. |
Step by Step Procedure Specific to Photoshop 5.5, 6.0
and 7.0 |
|
1. Do all your image manipulation at full resolution on the uncompressed
psd file.
2. Use IMAGE / IMAGE SIZE to resize pixels per inch and long
dimension AT THE SAME TIME - ENTERING THE PIXELS PER INCH BEFORE
ENTERING THE LONG PIXEL DIMENSIONS.
3. Use UNSHARP MASK (Filters / Sharpen / Unsharp Mask) to recover the sharpness lost by resizing.
4. Save at the smaller file size. I use the long pixel dimensions in
the file name.
5. Convert your image into a compressed jpeg using Save For
Web (file>Save For Web). Use the side by side comparison between the original psd and
the newly compressed jpeg to see how much compression you can get
away with. |
| Why Pixel
Dimensions |
| The only unit of measurement that means anything on the web
is pixel dimensions. This is a very confusing concept for people in the
print world to accept. DPI, LPI, and other forms of resolution are
meaningless on the web. A monitor has a screen resolution that can be set
to one of the following: 640x480, 800x600, 1024x768 etc. 1024x768 means
a monitor has a horizontal pixel width of 1024 and a
vertical pixel height of 768. The fact a monitor may be 13, 17,
19, or 21 inches diagonally just means the 1024x768 pixels are spread out over that number of inches. Therefore, a 500 pixel (width)
image takes about 50% of the horizontal screen size on any size
monitor running at 1024x768, or almost 80% of the screen if the monitor
runs at a resolution of 640x480.
|
| Technical information specific to Photoshop |
| Prior to Photoshop 5.5, I used
Ulead SmartSaver Pro
to compress my PSD files for the web. The feature that made it all work
for me was a side by side comparison between the original and the
compressed jpeg. With Photoshop 5.5, Adobe introduced a side by side
comparison called "Save For Web". It allows you to view the original file
next to the compressed file and make visual comparisons on how much
compression an image can take and still look good. Used properly this
feature enables you to create good looking smaller file size images for
the web. |
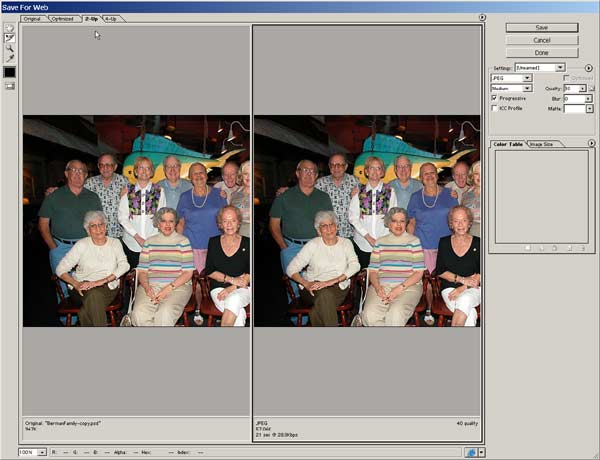 |
| When Photoshop is first
installed, the "Save For Web" filter is set to show only the
compressed image by default. Click on the tab marked "2 Up"
(white arrow pointer above) to set it to show a comparison
between the original file (left) and the compressed JPEG
(right). |
| Resources |
Preparing Images For
The Web
written for eDigitalPhoto Magazine |
| |
| |


