|
Preparing Digital Files for Jury Slides
[ Contents ] [
Articles ] [
Members ] Resources ] [Sponsors
]
[
Digital Jury Services for Artists ] [
Join the Forum ]
[ Support the Forum ] [ Consulting
] |
|
|
|
How I prepare my digital files for 35mm slides |
|
If I've made any mistakes on this
page, please notify me |
Slides.com
641 Basswood Ave
Verona, WI 53593 toll free
800-311-9543 |
IPrintFromHome.com
toll free 800-736-8652
716-228-2983 |
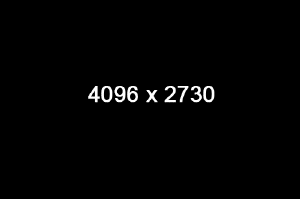
| Optimum pixel dimensions is 4096x2730, which results in approximately a 30
megabyte file, compared to the 8 megabyte files most photo labs provide
because of a PowerPoint mentality when the word "slides" is
mentioned. Smaller size files can
be submitted. If you do so, they will resize to the dimensions stated
above as that's what their film recorder requires. By resizing the files
yourself, you have the option to add Unsharp Mask (sharpening) to the
image prior to having the slides made. |
 | Understanding proportion |
|
| 35mmm proportion is 2:3. That means that
the longer dimension is 1.5 times the shorter dimension. Digital camera
files are 3:4 which means that the longer side is 1.33 times the shorter
dimension. In the illustration below, you can see the amount of image in
black that extends past the edges of the digital camera file (in white) to
fill the frame of a 35mm slide |
|

White area represents digital camera file proportion
Black area represents additional area needed for 35mm slide proportion |
| Open your image in an editing program, like
Photoshop or Elements II. |
|
| At all times, I'm using 300 pixels per
inch for my resolution, both in the image properties and in the new black
canvas I'm going to create. |
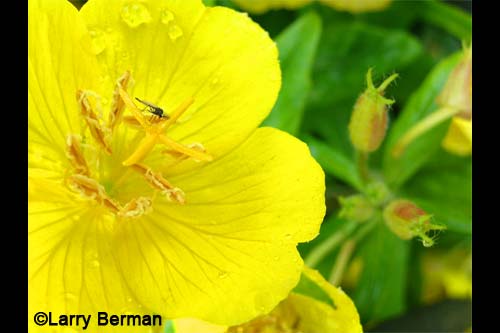
| Using one of my flower photos taken with a
CoolPix 5400. Shown below is the full image size out of camera with
no cropping. |
|
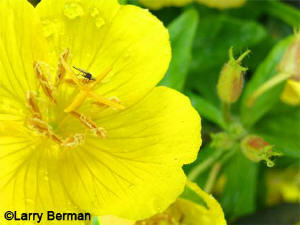
Original Flower Image size in pixel dimensions is
2592x1944 (3x4) |
| Create a new canvas in black |
|
| Under File>New>create a new canvas at the
4096x2730 and make it black. That will become the image that you'll add
your resized digital file into in the next step. |
|
 |
| Edit and resize |
|
| After editing (adjusting color and
contrast, etc.) the image needs to be resized. Remember that the original
pixel dimensions were 2592x1944. Now I resize so that the shorter
dimension is 2730, the shorter dimension of Slides.com optimized
submission requirement above. You can see a screen capture of the Image
Resize dialogue in the picture below. You can also see where I've entered
the 2730 for height and because Constrain Proportions is checked,
the width automatically adjusts proportionally. |
|
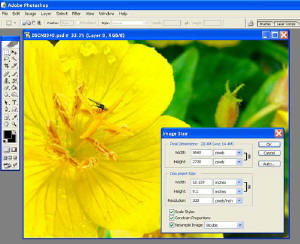
Resize options under Image>Image Size (in Photoshop) |
|
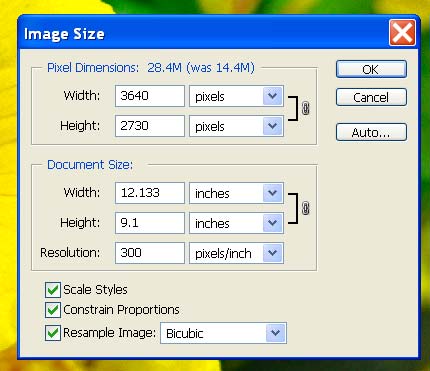
Image size dialogue close up
|
| Copy and Paste |
|
| After you've created the black canvas and
sized your digital camera file accordingly, copy the digital camera file
and paste it into the black canvas. In Photoshop (and Elements), if the
entire canvas is visible on screen, it will automatically paste into the
center leaving equal black borders on the two opposite sides where the
pixel dimensions is shorter than the 4096.You can see the resulting
image below making up the digital file to be sent to Slides.com. The
black area will mask the image and won't show during projection. After
you've finished, SAVE under a new file name and add Unsharp Mask
before flattening and SAVING AGAIN as another new file name.
The flattened image will be sent to Slides.com as it will be a smaller
file size than if you leave the layers active. |
| Cropping a digital camera file changes proportion
|
|
| While working on the image, if you decide
to crop for visual impact, go through the same resize steps. If the
proportion changes so that resizing the height makes the width wider than
4096, resize the width instead to 4096 so the height will be shorter than
2730. That will add the black canvas to the top and bottom in the step
below, instead of the left and right sides. |
| Unsharp Mask is under
Filters>Sharpen>Unsharp Mask
The amount you use is arbitrary and the image should be viewed at 100%
magnification for making sharpness judgments. Be careful as too much
sharpness will make the image look unnatural when projected. |
| Flatten is under
Layers>Flatten Image |
|
|
Digital file ready to submit for a Jury
Slide
|
|
DO NOT ADD YOUR COPYRIGHT TO THE
IMAGE FOR A DIGITAL SLIDE
art shows will not jury sides with identifying information
my copyright is on all of my WEB images, not digital slides |
| As a final note, with either service, black canvas
is automatically added so as not to
crop improperly proportioned images sent in for 35mm slides. But if you
want a different color background you must add that color background using
the method I've described above. |
| Photoshop knowledgeable people also
know that a similar result can be gotten by adding black canvas under
Image>Canvas Size. I prefer my method for the total control it gives me in
allowing me to continue to edit the image on an active layer even after
pasting it into the black canvas. |


