Getting startedYouíve been taking pictures for years.
Maybe showing your prints to friends and family members and they
constantly give you positive feedback and tell you how much they love your
photography. Telling you that you should be selling professionally, but
where to start. Or maybe youíve visited a major art show like Coconut
Grove, Ann Arbor or Cherry Creek, and have seen photographers selling
their work. Youíve thought about setting up a booth in front of hundreds
of thousands of people looking to purchase your photos. Art shows can
provide a viable way to earn a living doing what you like best, taking
pictures.
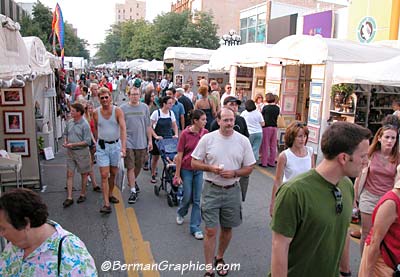
Ann Arbor 2002
When I first started exhibiting at art shows over 25
years ago, I would hang the images I was most proud of. Through ego
gratification and lack of experience at the bigger art shows, I spent my
early years doing the shows that were under an hour drive from my New York
City home, mostly mall shows, and selling my favorite pictures with
moderate success. Enough to enable me to quit my day job and try doing art
shows full time. What I didnít realize at the time was that there was a
completely different type of art show out there. An art show where you
could easily make as much money or more, in two days outdoors, that you
could have made in four or five days sitting in a mall reading a book and
eating.
At the better art shows weíre talking about the sale of
photography as a business, and in approaching it, realize that people do
art shows on a very professional level for a living to support their
families. The competition to jury into a show can produce some of the best
photography youíve ever seen. But of course you think that you have
something of value to contribute. Real photographic art that people are
just waiting in line to purchase.
If youíre planning on applying to some of the better art
shows, itís important to understand what other photographers are selling
and how they go about displaying their work. Walk a major show and check
out the competition. On a business level itís competition for the money,
and on a photographic level itís competition for the space in the show.
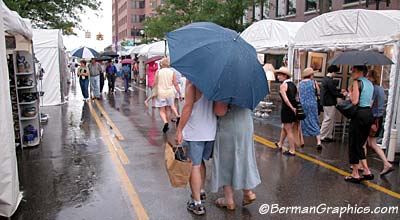
Ann Arbor 2002 in the rain
Thinking about what pictures to shoot
The importance of a unified body of work
One of the first things I learned when I started doing the better art
shows was that it was important to create a unified body of work for two
reasons. The first so as not to confuse the potential customer. When you
have people standing in your booth thinking about making a purchase, there
is a point that if they havenít made up their mind they walk away. The
other is the ďbooth (display) slideĒ. The application requirements of art
shows are that you submit individual slides of your work (usually four or
five) plus a slide of your display. The display slide will come across
more professional looking if the body of work is unified.
If youíre considering the art show market seriously,
youíre probably thinking about which images work well together or balance
one another, and how to shoot new pictures to compliment those you already
have. Iíve always compared the visual balance of a fully stocked display
to the composition within a single image. The importance is easy to
understand if you picture a row of 200 booths with people walking by. What
is it that will make them stop and be drawn in to browse your images?
Something has to grab them. One piece might be your ďshow stopperĒ but
visually it will have more impact if that piece is your entire booth.
How to prepare your images for exhibiting
When starting out, the image preparation will take a lot
of planning. Printing, mounting, matting and framing all have to be done
on a professional level. Taking into consideration that some art shows
require the photographer to do their own printing. Some art shows require
the photographer to supervise the printing and some art shows donít make
any such requirements at all on their applications. If youíre not going to
print your own, consider two resources. The first is a lab called Fine
Print that only prints quantity at wholesale prices. Itís one of the most
widely used labs by photographers selling at art shows. The other
consideration are digital prints by a machine called the LightJet,
which is used by most major service bureaus. The LightJet uses
conventional photographic paper that is exposed by a computer controlled
laser and processed in normal chemistry. We know of a lab called Foto 1
that does excellent work and prices their quantity LightJet prints similar
to quantity machine C print prices.
Materials and labor will become a factor in your selling
price, as will competition from your peers. As a generalization, you canít
spend $50 to print, mat and frame a 16x20 if you plan on selling it for
$100. But you can if youíre going to sell it for $300. But you canít sell
it for $300 if the other photographers are selling that size for $200. The
ultimate goal in the art show market is for your imagery can transcend the
price barrier. To sell art to people who donít use price as a
consideration. Or donít think about whether or not it matches the
wallpaper or couch.
Understand that our methods and resources are based on
years of preparing quantities of the same images, which keep the costs
down, but weíll also recommend ways to get you started without a major
investment.
The ďprint your ownĒ controversy takes a twist with the
introduction of the digital darkroom, which weíll explore later.
Aside from deciding whether to print your own, some
choices you will face will be whether to hinge or dry mount. Choices in
regular or acid free mat board or white core mat board as a compromise.
Choices whether to single or double mat. Choices in the type of frames
that you use. Remember to consider the overall look of your display. A
single style frame will look better than a different frame for each
different photograph. But if your body of work is eclectic, than you might
consider framing on a piece by piece basis.
I own two mat cutters. A Speed Mat wall mounted mat
cutter which is designed for production work, and a C&H cutter which I now
use as a way of sizing my mat boards. Iíve also used a company called
Dixie Matting to cut my mats when I was pressed for time and had some
major shows coming up. They have very reasonable prices for any size
quantity mats, either single or double.
You will need a source for framing supplies. Iíve used
both M&M Distributors and United Mfrs Supplies (which also sells mat
board) for my supplies. There are multitudes of companies that sell
frames. Just check out the advertisements in Dťcor Magazine. Iíve used a
small company called Florida Frames which sells quantities of wood frames
to art show exhibitors at wholesale prices. High quality Nielsen aluminum
frames can be purchased from most suppliers or Nielsen style aluminum
frames can be purchased from companies like Frame Fit.
I use non-glare glass on my photography. I think it
makes it look better on the display so as not to reflect everything in the
street in front of the booth. Itís a personal choice and doesnít work for
everyone. Non glare glass costs twice what regular framing glass costs. I
also back my framed photographs with fome cor which I get from my local
glass distributor. Fome cor is an acid free backing and mounting board
that is widely used in the framing industry. Both the fome cor and glass
are much less expensive if purchased by the box, which will save you money
if youíve standardized your picture and frame sizes. Some photographers
base their sizes on the available materials. Because mat board and fore
cor are available in 32x40 inch sheets, that 32x40 sheet can be cut to
produce four 16x20ís with no waste.
Besides the framed pictures to hang on my display, I
also offer unframed photographs for sale. This serves three purposes. It
gives you a less expensive item to prepare and sell. It generates money,
and it lets you display different images that might not have the same
theme as the ones hanging on the display. The unframed photos are matted
and mounted, just like their framed counterparts, and are displayed in
clear bags to protect the prints while people handle them. I get my clear
bags from a company called Impact Images. It is a much easier alternative
to shrink wrapping. Though slightly more expensive, the time factor makes
it worth the extra expense. Bags are available in all standard sizes for
two-dimensional artwork and have a flap with a peel-off adhesive strip to
make sealing easy. If your work is not sized conventionally, the bags can
be purchased over sized and trimmed with the heat sealing wand from a
shrink wrap machine. This is a good resource to know about. Even if youíre
not preparing photographs to sell at art shows, these bags can be used for
all your finished work to show friends and family members so as to protect
from damage or fingerprints.
Applying to an Art Show
How to find an art show to apply to
Most exhibitors hear about shows from other
exhibitors. Itís like a closed community. Iíve seen a lot of the same
people exhibiting for over 25 years. On the other hand, itís really
interesting to see new and different work being exhibited so I feel that
there is always room for newcomers. Aside from the individual state art
listings, there are two important resources that give you the information
needed to obtain an application for specific shows and how those shows
rank on a national level. The first and most important is the Art Fair
Sourcebook, put together by the veteran art show photographer Greg Lawler.
The book is published annually and is an expensive but necessary resource
if youíre considering art shows as a profession. It lists the top 300 art
shows in the country with an in-depth look at their requirements and
feedback comments that have been accumulated by the author. The other is
Sunshine Artist Magazine, which is the closest thing there is to a trade
magazine in the art show business. There are show reports listed by state,
and the rear contains a listing of art show contact information that is
listed by location and date. There are also advertisements throughout the
magazine for companies that sell products that are used by art show
exhibitors. If youíre just beginning, a subscription to this magazine is a
must read.
The first thing to consider is the application. Most art
shows mail out their applications six to eight months in advance. It lists
their requirements for admission and for display. It also lists the
quantity of slides required, how to prepare the slides, the fees to
enclose (both booth and application fee), the date it has to be postmarked
by and the SASE (self-addressed stamped envelope). Some applications have
room for a description of your work, either generally or by slide. You
canít just call up a show at the last minute and ask for a space. The show
has invited a group of ďexpertsĒ to jury the submitted slides on a preset
date. But donít expect feedback on your work. Currently the art shows just
put your slides in your SASE with a form letter telling you that you
havenít been accepted but to feel free to apply again next year. Not to
disillusion you, but there are shows that Iíve been accepted to after
applying to for over ten years. But those top shows maintain their
reputation and the sales have made it worth while for the ten years of
jury fees. If youíre serious about selling your photography at art shows
as a source of income, I recommend maintaining a list of the top shows and
applying to them every year. Even though itís almost like playing the
lottery, if you can produce a high quality of imagery, you have a chance
of being accepted at some point. Thatís how I approach the business.
Youíve been accepted into an art show
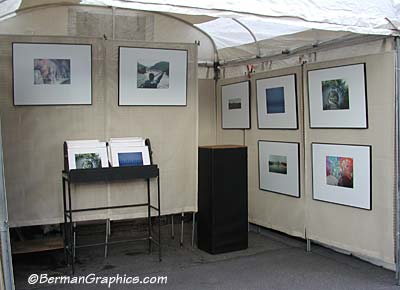
My booth from 2001
Canopies, display racks, bins for unframed and your
vehicle
Remember that I suggested walking a major show
to see what itís all about? Have you noticed that all the booths had
similar professional looking canopies? The first impression is that
theyíre supplied by the show, but thatís not the case. All the show
provides you with is 100 square feet of display space. Outdoor booth
spaces are usually a uniform 10 x 10 foot (or over) and those commercially
made canopies are exactly that size. If your first starting out and donít
want the initial expense, check with the show and see if they can
recommend a company that rents 10 x 10 canopies. The drawback is that
those rental units are either too flimsy or too dark inside. I use a
canopy called the Craft Hut from Newtonís Mobile Canvas. It seems to be
the sturdiest canopy on the market. Itís reasonably priced at
approximately $700 but be prepared to spend more. I also have numerous
options for it. One reason I chose that company was that they were willing
to work with me in letting me customize the canopy for my needs. Besides
the standard options like air vents and zippered awnings, I also have
skylights built into the roof along the sides to light up the walls,
instead of the standard skylight in the center. Iím selling photographs
that hang on the walls, not jewelry in display cases in the center of the
booth.
The walls of your booth that the photos hang on are not
part of the canopy. There is additional cost here to either purchase
commercially made ďdisplay racksĒ, or to make your own. Armstrong
manufactures the most professional looking racks. They are 6.5 feet tall
and connect together to form a stable display within your booth. Having a
friend who is a welder, I use homemade racks made from Ĺ inch electrical
conduit and turkey wire that has a 1x2-inch grid. Then I had professional
covers made so visually you canít tell that I didnít purchase them. I also
connect the racks together and to the corner uprights of the canopy (using
heavy-duty cable ties) to give it additional stability. As an alternative,
there are a few companies that make fabric walls that roll up for storage
and hang from the frame within the most popular canopies. This has mixed
blessings. The convenience of storage and lighter weight verses the lack
of stability if in a windy situation and lack of flexibility in how you
set your booth up. Another thing to consider is that they need the canopy
frame to hang which is a fixed 10x10. If you are planning to do any indoor
shows, the spaces are not always 10x10. You might have an 8x10 or 8x12
foot space and be unable to set up your canopy frame, therefore no walls
to hang your photography.
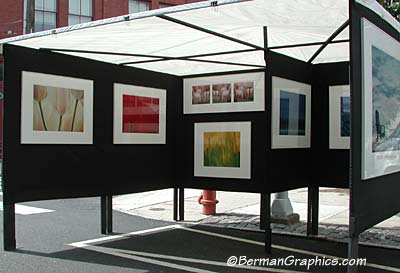
Gary
San Pietro uses this non commercial canopy and display
A chair is also an important piece of display equipment.
Something comfortable, that you can sit in for hours and tall enough that
you donít have to get up to speak to everyone that asks you questions. The
chair can also double as a worktable with a board across the arm rests. I
also use a homemade desk 12x15 inches by 42 inches high with a series of
shelves to hold my sales materials. Credit card machine, notebook, clear
bags that I put the customers purchases in.
I mentioned the weather and the importance of a sturdy
canopy. A few things Iíve always carried are the swivel dog leash stakes
(from any supermarket or pet store) and rope pieces to anchor into the
ground. In the street I use a screw gun and dry wall screws. I used to
carry weights made from PVC tubing filled with concrete until my display
took the brunt of an 70 mile per hour thunderstorm wind and lifted over 10
feet off the ground before collapsing onto itself, with concrete weights
in each corner. I still carry one weight for those shows that I have a
corner booth. If on a corner, I try to leave the outer side partially open
for people to see in, or walk through into my booth. That leaves the
corner upright unsupported by the racks that usually connect to it so I
attach a weight to help.
Display bins to show your unframed work need to be
carefully planned out in design and size. Since youíre only dealing with a
10x10 foot space, and expect thousands of people to see your work, you
need to design the booth interior to your best advantage. Iíve designed my
own display bins, and have purchased commercial bins that Iíve customized.
Most art shows donít let you pull your bin out in front because it
obstructs traffic. My display bins are all only 12 inches deep to maximize
the interior booth space. Even the bin for my larger 22x28 matted photos
is only 12 inches deep.
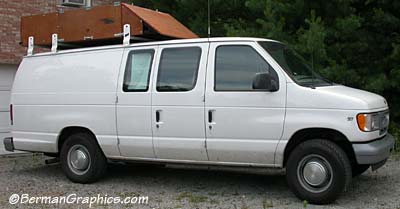
The box on the roof holds my display racks
So now you have a garage full of boxes of framed
photographs and a display to hang them on to sell. How do you get them to
the art show? I use 25 sheet mat board boxes to transport my framed
photographs. If you donít own a van or have a friend who does, your only
option is to rent one. If youíre serious about pursuing the art show
market as a career, eventually youíll end up purchasing a dedicated
vehicle for your new business. Mostly everyone doing art shows either owns
an extended van or a 10 foot high cube van the size of a UPS truck. The
first time you leave something important at home, youíll see the need for
owning a dedicated vehicle. I never unpack my van between shows and only
replace the inventory that has sold.
Which are the good Art Shows?
The following is a rough guide for the best art shows
(more shows and links will be added as I have the time). Coconut Grove
Arts Festival, Winter Park Art Show (Orlando), Oklahoma City Festival of
the Arts, Old Town Art Show (Chicago), 57th Street (Chicago), Boston Mills
Art Show (Peninsula Ohio), Cherry Creek Art Show (Denver), Madison On the
Square (Wisconsin), Central Pennsylvania Festival of the Arts (State
College PA), Ann Arbor (four shows to choose from), Uptown (Minneapolis)
Art Show, Longs Park Art Show (Lancaster PA), The Plaza (Kansas City),
Saint Louis Art Festival (Clayton MO), Des Moines Art Festival.
Some additional tips
Our Recommendations Ė Are based on personal use
and educated decisions learned from years of experience. But understand
that there are additional choices for everything weíve recommended.
Artists are independent by nature and tend to do things their own way.
Web Site Promotion - Use your web site URL as
your business name on your booth sign. Weíve found from experience that
our web site clients get a substantial increase in traffic after art shows
if they promote their web sites properly. We also have additional
promotional tips for art show exhibitors on our web site. Your art show
viewers are your biggest online customers.
Contacting People Interested in your Photography
- We recommend collecting e-mail addresses of interested people in two
ways. One is an e-mail collection form on your web site. Another is an
e-mail collection form you have in your booth. The best way is to maintain
a database of customer information so you can send out a broadcast e-mail
when. We use a program called World Merge for the PC or Max Bulk
Mailer for the MAC to send out broadcast
e-mail to interested people on a somewhat regular basis. Be aware that
we've encountered a 40% bounce rate from collected e-mail addresses due to
various reasons like people moving or changing their ISP. Some artists
collect street addresses and send out postcards also. Modern Postcard
offers good service and reasonable prices and will use your own artwork on
the postcards.
Security - Leaving your work overnight in a
secure canopy like the Craft Hut is something Iíve been doing for years.
Think of it this way. Your artwork has much less value to others than it
does to you. Donít use a moneybox. Use something that you can wear
unobtrusively or use your pockets. Iíve never left any money in my booth
overnight other than about $5.00 in change.
Credit Cards Ė Taking credit cards increases your
sales. Taking American Express increases your high dollar sales. People
who carry American Express cards will look for the sign in your booth
before inquiring about a purchase. When I started taking AmEx, my sales
immediately jumped. And I had been taking Mastercard and Visa for years.
Contact us if you need to take credit cards and your bank wonít let you
open a merchant account. We may have a few resources for you. Personally I use
the Nurit 2070 wireless credit card machine which Iíve owned for about six
years. There are newer, smaller and more versatile machines available now.
Weather - Carry a weather radio. They only cost
about $25 at Radio Shack and it will serve you well for years notifying
you of impending weather conditions that can damage your display. Carry a
few oversized white tarps and spring clips to fasten them to your display
as needed. A towel can also help if your work gets wet. Iíve also had
custom clear Craft Hut sides made so I can close up my booth in a heavy
rain and still let people look at my work but not drip water on it.
Lights Ė Iíve always carried a small box of six
small clip-on lights and extension cords for emergencies. You never know
when youíll be under a tree on an overcast day and the person next to you
might have a generator. Or the food vendor nearby offers to share his
electricity. As a matter of fact, before I sold my cube van, I carried a
silent Honda 600-watt generator for just those occasions. For shows that I
know will provide electric, I carry a 10 foot light bar and track lights
for a classier looking presentation.
Transporting Your Photographs Ė As I previously
stated, I use 25 sheet mat board boxes to transport my photographs. The
boxes are 32x40x2 inches deep and can be easily cut down if needed. Most
framed pieces will fit in that space and aluminum frames can fit two in a
box back to back. Make sure to ask for the box when ordering mat board. If
youíre ordering larger quantities, ask for it to be packed in 25 sheet
boxes so it can be shipped UPS. Iíve also purchased large quantities of
empty mat board boxes so I donít have to worry about running out.
So, given the extent of the information weíve made
available to you, if you decide to give it a try, be sure to stop by
Larry Bermanís or Chris Maherís photography booth and say
hello. Chris can also be found in his wife Annette Morrin's booth
helping sell her jewelry.


